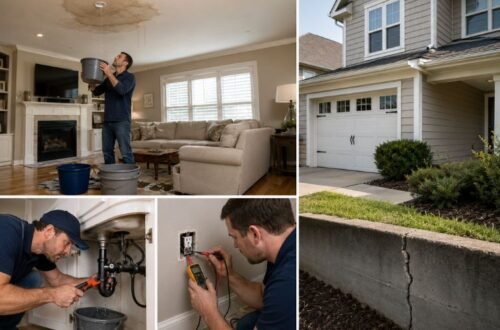

Proven techniques for plaster, drywall, and ceiling cracks — done right the first time.
Hairline cracks in walls are one of the most common issues homeowners encounter. You paint a room, everything looks perfect, and then a few weeks or months later, a thin crack appears above a doorway, near a window, or across a plaster wall. While these cracks can be frustrating, they are often harmless and caused by normal movement within the home.
The mistake many people make is simply filling the crack and painting over it. Unfortunately, this quick fix rarely lasts. The good news is that most hairline cracks can be repaired successfully using the right techniques and materials.
In this guide, you’ll learn:
- What causes hairline cracks in walls
- When a crack is normal and when it may indicate a bigger problem
- The best way to repair wall cracks permanently
- How to fix hairline cracks in plaster walls
- Common mistakes that cause cracks to return
- Tips to prevent future wall cracking
Quick Answer: How Do You Fix Hairline Cracks in Walls?
- Inspect the crack for signs of structural damage
- Widen the crack slightly using a utility knife
- Remove dust and loose debris
- Apply a flexible crack filler
- Smooth the filler and allow it to dry
- Sand the surface lightly
- Apply a finishing compound if needed
- Prime the repaired area
- Repaint the wall
The key step that many DIYers skip is widening the crack before filling it. This allows the filler to bond properly and helps prevent the crack from reappearing.
What Is a Hairline Crack?
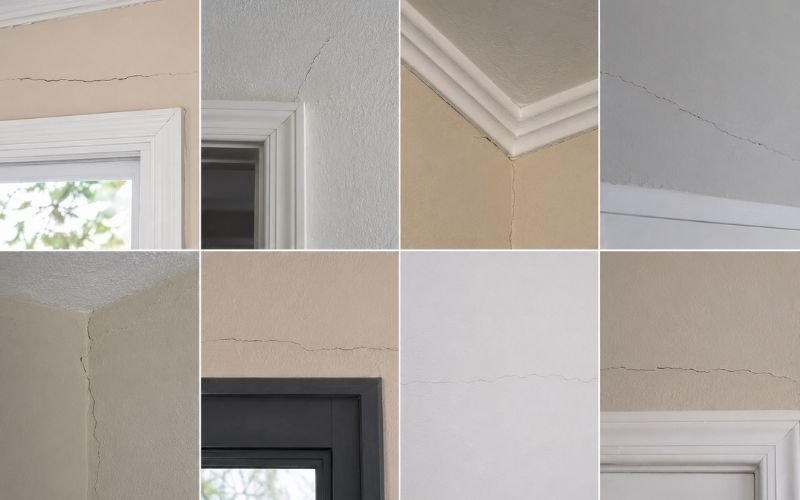
A hairline crack is a very thin crack that typically measures less than 1/16 inch (about 1.5 mm) wide. These cracks often develop in plaster walls, drywall surfaces, ceilings, and around door or window frames.
Hairline cracks usually occur because building materials naturally expand and contract due to changes in temperature, humidity, and settlement.
Common Locations
- Above windows
- Around door frames
- Ceiling corners
- Wall-to-ceiling joints
- Drywall seams
- Plaster surfaces
Most hairline cracks are cosmetic rather than structural. However, it’s important to understand what caused the crack before attempting repairs.
Why Do Hairline Cracks Appear in Walls?
Understanding why cracks form helps you choose the correct repair method and determine whether the issue is serious.
Natural House Settlement
All homes settle over time. As a house adjusts to the soil beneath it, slight movement occurs throughout the structure. This movement can create stress within walls, causing small cracks to form in plaster or drywall. Settlement cracks are especially common in newer homes during the first few years after construction.
Signs of Settlement Cracks
- Thin vertical cracks
- Small cracks above windows and doors
- Cracks that remain the same size over time
Seasonal Expansion and Contraction
Building materials respond to changing temperatures and humidity levels. During warmer months, materials expand. During colder or drier periods, they contract. This repeated movement can cause hairline wall cracks, ceiling cracks, and cracks along drywall joints. Homes in areas with significant seasonal weather changes often experience this type of movement.
Drying and Shrinkage of Plaster
Plaster naturally shrinks as it cures. If plaster dries too quickly or wasn’t applied properly, small cracks may develop as moisture evaporates from the material. These cracks are often cosmetic and relatively easy to repair.
Poor Drywall Installation
Drywall cracks sometimes result from installation problems such as improper taping, weak joints, insufficient screws, or inadequate joint compound application. Cracks along drywall seams often indicate workmanship issues rather than structural concerns.
Minor Structural Movement
Even well-built homes experience minor structural movement over time due to soil expansion, soil shrinkage, foundation settling, and temperature fluctuations. In most cases, minor movement creates only cosmetic cracking.
Are Hairline Cracks in Walls Normal?
In many homes, yes. Hairline cracks are extremely common and are usually not a cause for concern.
Hairline Cracks Are Usually Normal If:
- They are very thin
- They do not widen over time
- There are only a few isolated cracks
- Doors and windows operate normally
- No water damage is present
⚠ You Should Investigate Further If: Cracks continue growing, multiple cracks suddenly appear, doors begin sticking, floors become uneven, or cracks exceed 1/4 inch in width. When these warning signs occur, professional evaluation may be necessary.
Signs a Wall Crack May Indicate a Structural Problem
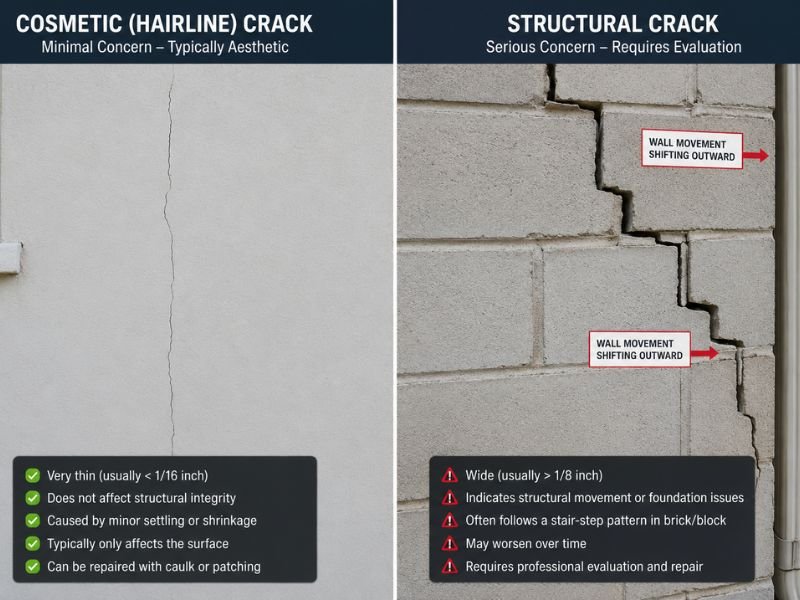
Most hairline cracks are harmless, but some cracks can signal more serious issues.
Horizontal Cracks
Horizontal wall cracks may indicate foundation pressure or structural stress. These cracks deserve closer inspection, especially if they continue to expand.
Stair-Step Cracks in Brick Walls
Cracks that follow mortar joints in a stair-step pattern can indicate foundation movement. These cracks often require professional assessment.
Wide Cracks Over 1/4 Inch
The wider a crack becomes, the more likely it is that significant movement is occurring. Large cracks should never be ignored.
Doors and Windows No Longer Function Properly
If cracks appear alongside sticking doors or windows, structural movement may be affecting the home’s frame.
Water Damage Around Cracks
Moisture intrusion can weaken wall materials and worsen cracking. Look for peeling paint, mold growth, water stains, or soft drywall. Address moisture problems before repairing the crack.
Tools and Materials You’ll Need
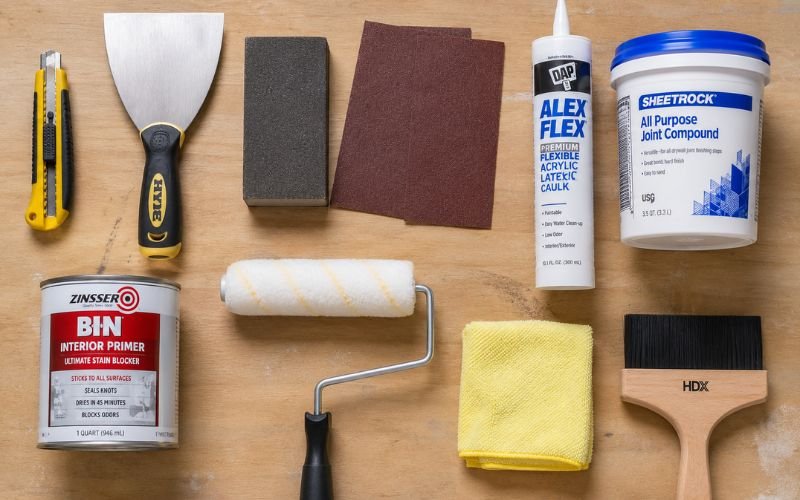
Gathering the right supplies before starting will make the repair process much easier.
Essential Tools
- Utility knife
- Putty knife
- Filling knife
- Sanding block
- Sandpaper (120–220 grit)
- Dust brush
- Microfiber cloth
- Paintbrush or roller
Recommended Materials
- Flexible crack filler
- Joint compound
- Fine surface filler
- Primer
- Matching paint
Pro Tip Flexible fillers perform better than rigid fillers because they can move slightly with the wall. This flexibility helps prevent cracks from returning.
Step-by-Step: How to Fix Hairline Cracks in Walls
Follow these steps carefully for the most durable repair.
- Inspect the Crack Before beginning repairs, examine the crack closely. Ask yourself: Is the crack widening? Is moisture present? Is there evidence of structural movement? If the crack appears cosmetic, proceed with the repair.
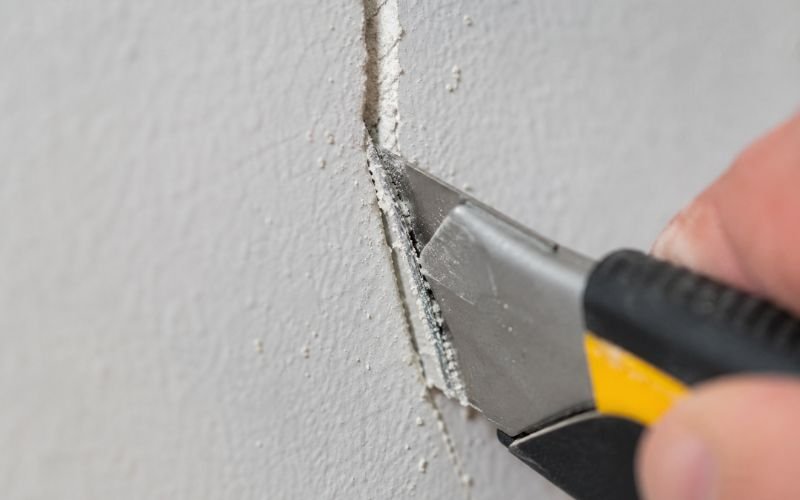
- Widen the Crack Slightly This is the most important step. Using a utility knife, cut along the crack, remove loose material, and create a shallow V-shaped groove. Aim to widen the crack by only a few millimetres. This allows the filler to penetrate deeply rather than sitting only on the surface.
- Remove Dust and Debris Brush away dust, vacuum if necessary, and wipe the area with a slightly damp microfibre cloth. A clean surface improves filler adhesion significantly.
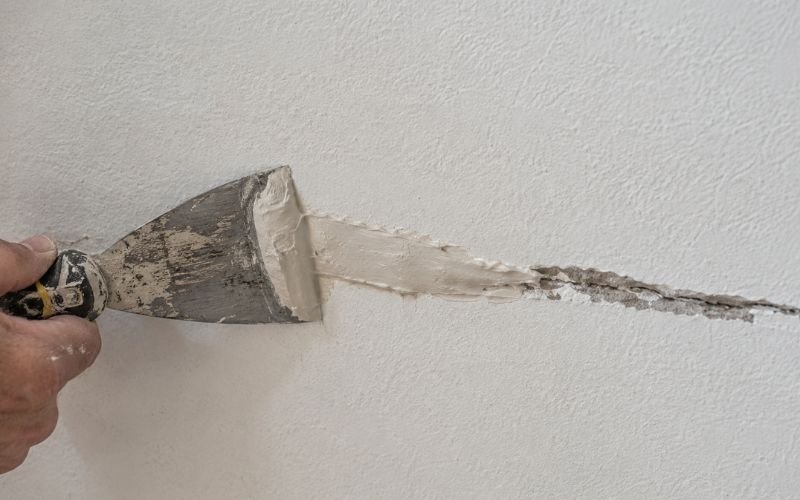
- Apply Flexible Crack Filler Using a filling knife or caulking gun, force filler deep into the crack, eliminate air pockets, and ensure the entire groove is filled. The goal is to create a strong base layer, not a perfectly smooth finish at this stage.
- Allow the Filler to Dry Completely Drying times vary depending on the product used. Always follow the manufacturer’s instructions. Rushing this step can cause shrinkage and premature failure.
- Sand the Surface Lightly Once dry, use medium-grit sandpaper to remove high spots and smooth the repair area. Avoid aggressive sanding, which can damage surrounding paint or plaster.
- Apply a Fine Surface Filler Spread a thin layer of finishing compound, feather the edges outward, and blend the repair into the surrounding wall. A wide feathered edge creates a professional finish.
- Sand Again If Necessary After the finishing compound dries, lightly sand any imperfections. Check the repair under good lighting. The surface should feel completely smooth to the touch.
- Prime the Repaired Area Primer helps seal the filler, improve paint adhesion, and prevent flashing or patchiness. Skipping primer often results in visible repair marks after painting.
- Repaint the Wall Apply paint that matches the existing finish. Use the same paint sheen, blend paint beyond the repaired area, and apply multiple thin coats if needed. Once dry, the repair should be virtually invisible.
How to Repair Hairline Cracks in Plaster Walls
Plaster walls require a slightly different repair approach than drywall because plaster is harder, less flexible, and more prone to cracking as homes age. Avoid simply applying paint over a crack in a plaster wall — it will almost always reappear.
Best Method for Plaster Wall Crack Repair
- Open the crack slightly using a utility knife
- Remove all dust and loose plaster
- Apply a flexible crack filler into the groove
- Allow the filler to dry completely
- Apply a thin layer of fine surface filler
- Sand smooth
- Prime and repaint
Common Plaster Repair Mistakes
- Using rigid filler instead of flexible filler
- Skipping the cleaning stage
- Applying filler over loose plaster
- Painting before the filler has fully cured
Older homes often experience recurring plaster cracks because of seasonal movement. Using flexible repair products helps accommodate this movement and reduces the chance of future cracking.
How to Repair Hairline Cracks in Drywall
Drywall cracks often appear at seams where two sheets of drywall meet. These cracks can develop because of house settlement, poor taping, weak drywall joints, or temperature fluctuations.
For Small Hairline Cracks
- Widen the crack slightly
- Remove debris
- Fill with a flexible filler or joint compound
- Sand smooth
- Prime and paint
For Recurring Drywall Seam Cracks
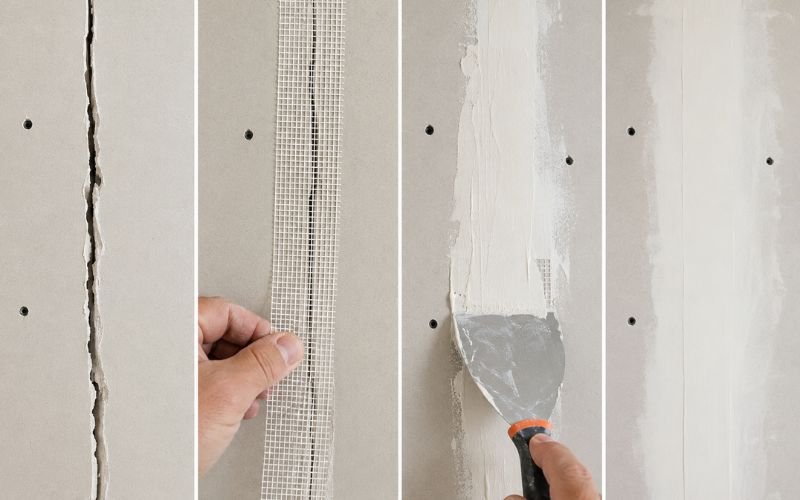
If a crack repeatedly returns along a drywall joint, remove loose compound, apply drywall mesh tape, cover with joint compound, feather the edges, sand smooth, then prime and repaint. Mesh tape provides additional reinforcement and helps prevent future movement from reopening the crack.
How to Fix Hairline Cracks in Ceilings
Ceiling cracks can be alarming because they are highly visible and often appear larger than they actually are. Fortunately, most ceiling hairline cracks are cosmetic.
Common Causes of Ceiling Cracks
- Building settlement
- Drywall joint movement
- Seasonal expansion and contraction
- Aging plaster ceilings
Ceiling Crack Repair Process
- Inspect the crack — check whether it is growing, sagging, or accompanied by water stains. If water damage is present, fix the leak first.
- Open the crack slightly — use a utility knife to create a small groove.
- Fill with flexible filler — apply deep into the crack.
- Smooth and allow to dry — remove excess material and let it cure fully.
- Apply finishing compound — feather the edges outward to blend the repair.
- Prime and repaint — a stain-blocking primer may be necessary if water damage previously occurred.
Common Mistakes That Cause Cracks to Come Back
Many wall crack repairs fail because homeowners unknowingly skip critical steps. Avoid these common mistakes.
Filling the Crack Without Opening It
This is the most common mistake. When filler sits only on the surface, it lacks enough material to bond properly and usually fails within weeks. Always create a small groove before filling.
Using the Wrong Type of Filler
Not all fillers are designed to handle movement. Standard fillers can become brittle and crack again. Flexible fillers are generally the better choice for hairline crack repair.
Ignoring Moisture Problems
Water damage weakens plaster, drywall, and paint. If moisture is causing the crack, repairing the wall without addressing the source will only provide a temporary solution. Always investigate roof leaks, plumbing leaks, and condensation issues.
Skipping Primer
Many DIYers go straight from filler to paint. Without primer, paint may absorb unevenly, the repair may remain visible, and adhesion may suffer. Primer helps create a uniform finish.
Painting Too Soon
Even if filler feels dry on the surface, deeper layers may still contain moisture. Painting too early can lead to shrinkage, cracking, and uneven finishes. Always follow the recommended drying times.
Best Wall Crack Fillers for Long-Lasting Repairs
The best filler depends on the type of crack and wall material.
| Filler Type | Best For | Flexibility | Ease of Use |
|---|---|---|---|
| Flexible Crack Filler | Hairline cracks | Excellent | Easy |
| Acrylic Decorator’s Caulk | Small movement cracks | Very Good | Easy |
| Joint Compound | Drywall repairs | Moderate | Moderate |
| Fine Surface Filler | Final finishing | Low | Easy |
| Spackling Paste | Minor cosmetic repairs | Moderate | Easy |
Which Filler Is Best?
For most hairline wall cracks, a high-quality flexible filler offers the best long-term performance because it can accommodate minor wall movement without splitting.
How to Prevent Hairline Cracks from Returning
While it’s impossible to prevent all wall movement, there are several ways to reduce future cracking.
Maintain Consistent Indoor Humidity
Large swings in humidity can cause building materials to expand and contract. Aim for indoor humidity levels between 30% and 50%.
Address Water Leaks Quickly
Water damage weakens walls and accelerates cracking. Inspect regularly for roof leaks, pipe leaks, and window leaks, and repair problems promptly.
Monitor Foundation Movement
Small settlement is normal, but significant foundation movement should be addressed before it causes widespread cracking. Watch for expanding cracks, uneven floors, and sticking doors and windows.
Repair Small Cracks Early
Hairline cracks are easier to repair when they first appear. Waiting too long may allow them to widen and require more extensive repairs.
Keep Indoor Temperatures Stable
Frequent temperature fluctuations can increase expansion and contraction within wall materials. Maintaining a relatively consistent indoor temperature helps minimise stress on walls and ceilings.
Frequently Asked Questions
Should I Worry About Hairline Cracks in Walls?
Most hairline cracks are harmless and result from normal settlement or seasonal movement. However, cracks that continue growing or appear alongside other structural symptoms should be evaluated by a professional.
Can I Paint Over Hairline Cracks?
You can, but it’s not recommended. Paint alone will not solve the underlying issue, and the crack will likely become visible again after a short period.
What Is the Best Filler for Hairline Cracks?
Flexible crack fillers are generally the best choice because they can tolerate minor wall movement better than standard fillers.
Why Do Wall Cracks Keep Coming Back?
Recurring cracks often occur because the crack wasn’t widened before filling, the wrong filler was used, ongoing movement exists, or moisture problems remain unresolved.
Can Hairline Cracks Indicate Foundation Problems?
Most hairline cracks are cosmetic. However, cracks that widen significantly, appear in large numbers, or occur alongside uneven floors and sticking doors may indicate foundation movement.
How Long Does a Wall Crack Repair Last?
A properly repaired hairline crack can remain invisible for many years. Longevity depends on the quality of the repair and whether ongoing movement continues.
Should I Hire a Professional?
Consider hiring a professional if cracks exceed 1/4 inch wide, cracks continue growing, structural movement is suspected, or water damage is present.
Expert Tips for Invisible Wall Repairs
Professional decorators use a few tricks that make repaired cracks virtually disappear.
Feather the Repair Area
Spread finishing compound several inches beyond the crack to avoid visible edges.
Check Repairs in Natural Light
Different lighting angles can reveal imperfections that are invisible under artificial light.
Match Paint Sheen Carefully
Even perfectly matched paint colours can stand out if the sheen differs.
Prime Larger Repair Areas
Primer helps create a consistent texture and appearance across the entire wall.
Don’t Rush Drying Times
Patience often determines whether a repair lasts for months or for years.
Final Thoughts

Hairline cracks in walls are a normal part of homeownership and, in most cases, are nothing to worry about. Whether they appear in plaster walls, drywall, or ceilings, understanding the cause of the crack is the first step toward a successful repair.
The secret to a long-lasting wall crack repair is proper preparation. By opening the crack slightly, using a flexible filler, and finishing the surface correctly, you can create a repair that remains smooth and invisible for years.
While most hairline cracks are cosmetic, it’s important to stay alert for signs of larger structural issues. Cracks that widen, spread rapidly, or appear alongside other warning signs deserve professional evaluation.
With the right tools, materials, and techniques, fixing cracks in walls is a straightforward DIY project that can restore the appearance of your home and help prevent future damage.